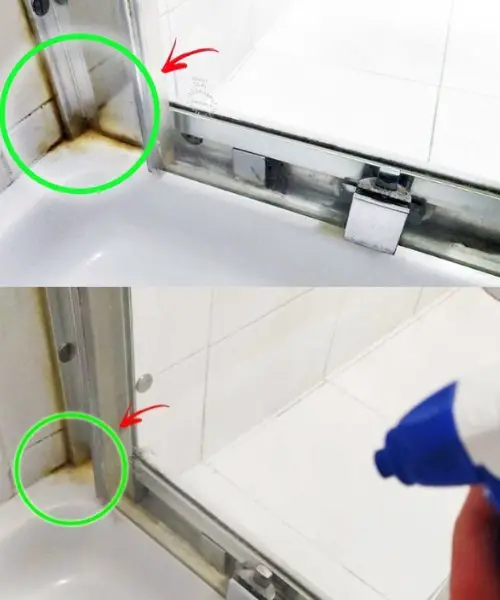
Mold creeping into the silicone edges of your shower can be an eyesore and a health hazard. Bathrooms, especially showers, are the perfect breeding grounds for mold due to constant moisture, warmth, and lack of ventilation. Over time, black spots appear on the silicone seals, stubbornly clinging even after regular cleaning.
But don’t worry—there are simple, natural ways to tackle mold without relying on harsh chemicals. Today, we’ll cover practical, eco-friendly methods to remove mold from silicone in the shower and prevent it from returning.
Why Does Mold Form on Silicone in the Shower?
Silicone sealant is commonly used in showers to keep joints watertight. However, its porous surface can trap moisture, soap scum, and dirt, creating an ideal environment for mold and mildew to thrive. Poor ventilation, infrequent cleaning, and hard-to-reach corners only accelerate the growth of mold.
Beyond the unsightly black stains, mold can trigger allergies, respiratory issues, and unpleasant odors. That’s why regular maintenance and thorough cleaning of silicone seals are essential.
Safety First: Protect Yourself When Dealing with Mold
Before jumping into cleaning, always take precautions when dealing with mold:
- Wear gloves to protect your skin.
- Use a mask to avoid inhaling mold spores.
- Ensure proper ventilation by opening a window or using a bathroom fan.
Natural Methods to Remove Mold from Silicone
Let’s explore three highly effective, chemical-free ways to remove mold from silicone in your shower.
1. Baking Soda, Salt, and Hydrogen Peroxide Solution
Ingredients:
- 1 liter of water
- 3 tablespoons baking soda
- 3 tablespoons fine salt
- 3 tablespoons hydrogen peroxide (3%)
Steps:
- In a bowl, mix the water, baking soda, salt, and hydrogen peroxide.
- Pour the solution into a spray bottle for easy application.
- Spray generously over the moldy silicone areas.
- Let it sit for at least 20 minutes to allow the solution to break down the mold.
- Using an old toothbrush, scrub the silicone gently but thoroughly.
- Rinse with plenty of water.
For persistent mold, repeat the process as needed.
Why It Works:
- Baking soda has antifungal and antibacterial properties.
- Salt acts as a mild abrasive to scrub away mold.
- Hydrogen peroxide disinfects and kills mold spores effectively.
2. Cotton Coil and Hydrogen Peroxide Method (For Stubborn Corners)
If mold persists, especially in tight shower corners, this trick is a game changer:
You’ll need:
- Cotton rolls or cotton pads
- Hydrogen peroxide
- Baking soda (optional)
Steps:
- Soak cotton rolls in hydrogen peroxide.
- Apply the soaked cotton strips directly onto the moldy silicone, pressing gently.
- Leave overnight (8-10 hours) to allow the peroxide to deeply penetrate the mold.
- Remove cotton, scrub lightly if needed, and rinse with water.
Optional:
Sprinkle baking soda on the silicone before applying the cotton for extra cleaning power.
3. Lemon Juice and Baking Soda Combo
Ingredients:
- Fresh lemon juice
- Baking soda
Steps:
- Sprinkle baking soda directly on the moldy silicone.
- Pour lemon juice over the baking soda. It will fizz and bubble—this reaction helps lift grime.
- Let sit for 15-20 minutes.
- Scrub with a toothbrush and rinse thoroughly.
Why It Works:
Lemon’s natural acidity kills mold and leaves behind a fresh, clean scent. Baking soda enhances the scrubbing effect.
Prevent Mold From Returning
Cleaning mold is only half the battle. Here’s how to prevent future buildup:
- Ventilation: Always run a bathroom exhaust fan during and after showers. Keep windows open if possible.
- Wipe Down Surfaces: After each shower, use a squeegee or cloth to remove excess water from walls, glass, and silicone seals.
- Use Vinegar Spray Weekly: Mix equal parts water and white vinegar in a spray bottle. Spray on shower surfaces weekly to deter mold.
- Dry Silicone Completely: Mold thrives in damp environments, so ensuring seals stay dry is key.
- Inspect Regularly: Check silicone edges periodically. Address small spots before they spread.
When Should You Replace Silicone?
Sometimes, even after thorough cleaning, mold has penetrated so deeply into the silicone that removal is impossible. Signs it’s time to replace silicone:
- Persistent black stains after multiple cleanings
- Silicone is peeling, cracking, or deteriorating
- Strong mildew odor lingers
Removing old silicone and resealing is a more permanent solution, ensuring long-term cleanliness and mold resistance.
Final Thoughts
Shower mold is a common but manageable issue. With these natural, effective cleaning methods—using simple ingredients like baking soda, lemon juice, salt, and hydrogen peroxide—you can restore the look of your silicone seals without harsh chemicals. Not only will your bathroom look better, but you’ll also create a healthier environment free of mold spores.
By incorporating a few preventative habits into your routine, you can keep mold at bay for good.