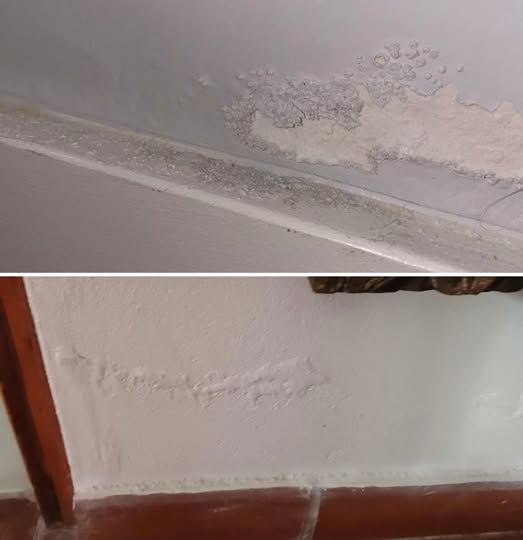
Rising damp is a prevalent issue in many homes, particularly in older structures or those lacking adequate damp-proofing. It occurs when groundwater ascends through the walls via capillary action, leading to unsightly stains, mold growth, and potential structural damage over time. Addressing this problem promptly is crucial to maintain the integrity and aesthetics of your home.
Understanding Rising Damp
Rising damp transpires when moisture from the ground travels upward through the porous materials of a building’s walls, such as brick, stone, or mortar. This moisture can carry soluble salts, which may crystallize and cause plaster and paint to deteriorate. Common indicators of rising damp include:
- Tide Marks and Staining: Yellowish or brownish stains appearing on walls up to a meter above floor level.
- Peeling Paint or Wallpaper: Decorative finishes losing adhesion due to moisture.
- Salt Efflorescence: White, powdery deposits on wall surfaces.
- Deteriorating Plaster: Blistering or crumbling plasterwork.
- Mold Growth: Black spots or mildew, particularly in poorly ventilated areas.
DIY Method to Treat Rising Damp
While severe cases may require professional intervention, minor instances of rising damp can often be addressed with a DIY approach. One effective method involves the application of a water-repellent or anti-humidity mortar to create a barrier that prevents moisture from ascending through the walls.
Materials Needed:
- Water-repellent mortar or anti-humidity mortar
- Spatula or trowel
- Brush
- Protective gloves
- Dust mask (optional, for safety)
Step-by-Step Guide:
- Surface Preparation:
- Begin by removing any existing paint, wallpaper, or loose plaster from the affected area to expose the bare wall surface.
- Thoroughly clean the wall to eliminate dust, dirt, and efflorescence. A wire brush can be effective for this purpose.
- Ensure the wall is dry before proceeding.
- Application of Water-Repellent Mortar:
- Prepare the water-repellent mortar according to the manufacturer’s instructions.
- Using a spatula or trowel, apply a uniform layer of the mortar to the affected area, ensuring complete coverage.
- Smooth the surface to achieve an even finish.
- Curing Process:
- Allow the mortar to cure as per the manufacturer’s guidelines. This typically involves maintaining adequate ventilation and avoiding exposure to moisture during the curing period.
- Finishing Touches:
- Once fully cured, the treated area can be replastered, if necessary, and painted or decorated to match the surrounding wall.
Preventative Measures:
To minimize the recurrence of rising damp, consider implementing the following measures:
- Damp-Proof Course (DPC): Ensure your property has an effective DPC installed. In older buildings, this may be absent or deteriorated, necessitating installation or repair.
- Proper Drainage: Maintain adequate drainage around the property to prevent water accumulation near the foundation.
- Ventilation: Enhance airflow within the building to reduce humidity levels, thereby decreasing the likelihood of damp issues.
- Regular Maintenance: Inspect and repair gutters, downpipes, and external walls to prevent water ingress.
When to Seek Professional Help:
While the DIY method outlined can be effective for minor cases, significant or persistent rising damp issues may require professional assessment and treatment. Specialists can conduct a thorough survey to identify the root cause and recommend appropriate remedial actions, such as chemical DPC injection or electro-osmotic systems.
Conclusion:
Addressing rising damp promptly is essential to preserve the structural integrity and appearance of your home. By following the DIY method described, homeowners can tackle minor damp issues economically and effectively. However, for extensive problems, consulting a professional is advisable to ensure a comprehensive solution.

